Billing for a Pre-Mixed Compound
When billing for pre-mixed compound, it is important to note that because this mixture is not actually mixed at your pharmacy you will have to bill it differently than you would bill mixture that were mixed at your pharmacy. You must ensure you charge your patient your dispensing fee for drugs, and not your dispensing fee for mixtures.
To bill a pre-mixed compound, do the following:
- Create a Custom Class in List Maintenance.
- Select More > List Maint.
- Select Custom Class from the dropdown list.
- Select the
 button. A new row appears.
 - In the Description column enter Premixed Compounds.
- Select the OK button.
- Set the Pricing for your Premixed Compound Custom Class.
- Select More > Pharmacy.
- Select the Pricing tab.
- Highlight the Pharmacy row and select the
 button.
 - Highlight Premixed Compounds and select the OK button.
- Set your pricing for how you wish to bill pre-mixed compounds.
Note: Ensure your Fee reflects the same fee your pharmacy charges when dispensing a drug.
- Select the
 button.
- Create a New Drug File.
- Select the
 button.
 - Search for the pre-mixed compound to ensure it does not already exist.
- Select the New button. A new drug file opens.
- Enter all the necessary information for the pre-mixed mixture.
- Select the Save button.
- Select the
-
Create a New Mixture File.
- Select More > Mixture.
- Search for the pre-mixed compound to ensure it does not already exist.
- Select the New button. A new mixture file opens.
- Enter all the necessary information for the pre-mixed mixture.
Note: Ensure your Mixing Qty and Mixing Time are 0 since your pharmacy is not actually mixing the compound.
- In the main tab, select the button.
- Search for and select the drug file created in Step 3 above. The drug file you created in Step 3 will now be listed as an ingredient in this mixture file.
- Select the Alternatives tab.
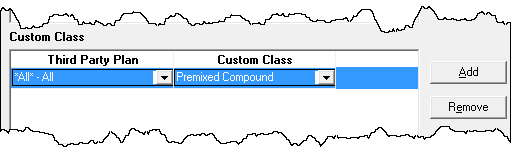
- Select the button next to the Custom Class section. A new row appears.
- Ensure your row appears similar to the following image:
- Select the button.